Showing posts with label my house. Show all posts

Thursday, December 20, 2012

Reclaiming An Underused Space

One complaint I hear over and over is that people don't have enough space. Not enough closet space, not enough kitchen space, not enough bathroom space. Often, it truly is a square footage problem. But, frequently there is plenty of space, it just isn't being used properly. Now, the house I call home has way more square footage than two people need, but I'm constantly looking for ways to better use the space we have.

Perfect example, our morning room. It's a wonderful area, open to the kitchen, with high ceilings and lots of windows overlooking the back yard--where seasonal flowers bloom just outside the window, and birds of all types (plus the more than occasional squirrel) gather to feed.  But when furnished with just a dining table, it was rarely used. Despite having  a formal dining room, a counter for eating in the kitchen, AND a morning room, we take most of our meals in the great room in front of the TV. It seemed such a waste to have an inviting room that we simply didn't use. So,  a few months back we decided to change that.

First, a look at the BEFORE:

Lots of unused square footage around the room, and a table that collected dust instead of memories of family dinners. 

First, we had to decide just what to do with the room. We had no real NEEDS for it, so it became a question of what we wanted it to be. We entertain fairly frequently, so adding a bar area where we could serve drinks during parties was one idea. And with it's wonderful morning light, I pictured a space where we could sit and have our morning coffee and read the paper (or, in our technology-heavy home, read the news on our iPads.) We weren't quite ready to give up using it for meals...we did occasionally have breakfast in there. So the wish list became: a bar, some comfy chairs, and a dining table that would at least seat two. We started out thinking we would purchase a piece of furniture to use as a bar, and look for a bar-height table that would tuck into one corner. But, as with all projects, our thinking changed as deals were found and the new room came together.

After pricing several pieces of furniture, and realizing that a wine fridge would be a great addition, we decided it made more sense to do something built-in. So we tracked down the person who did our adjoining kitchen when the house was built, and had a new bar built to match the existing kitchen cabinets. (I could get long winded about the four months it took to finish the cabinetry, but that's a story for another time.) The upper cabinets provide a great spot for glassware (and frees up the cabinets that used to hold these for other uses), while the wine fridge keeps drinks of all kinds cold (freeing up space in the big fridge), and the lower cabinets provide storage for table linens and small appliances.

The new dining area is visible here too. I picked a small glass topped table and two upholstered dining chairs. When needed, it's a perfect spot for a meal for two. But the chairs are comfy enough that the room now serves as a secondary living space. 

The opposite side of the room now has two comfy club chairs, which we have used just as we imagined. Any Saturday or Sunday morning, you'll find us piled up on the chairs with our breakfast danish and coffee. While most of the furniture was bargain finds, I splurged on some custom pillows and ottoman (which has wheels to give it some flexibility)

Custom made ottoman lets us kick our feet up. The pleated skirt and button tufting add some softness to the room. 

Custom pillows with silk cording and blingy trim add some sparkle.

Much better if I do say so myself! So how about you? Are there rooms in your house that you could be using better? Let us know in the comments, and don't forget to join us on Facebook!

Monday, January 23, 2012

A Few Projects at my Own House

A few weeks ago I shared the in progress redecoration of my foyer. (That post is HERE.) Well, after two and a half days of acrobatics high above the floor, the foyer is all done except for a few touch ups. I'm very pleased...it brings the high foyer down to a much more human and inviting scale. We painted the outside corners of the design in a color that is a shade or two darker than the wall color (we have also used that darker accent on a niche and our fireplace) The center area of the molding was papered with a tone on tone damask that repeats the two colors. (A hint of bronze metallic throws off the color a bit in photos.)

Forgive the quick cell phone pictures, will take some better ones soon.


Before, tall blank walls that begged for SOMETHING.


During the redecoration--trim was in place but unpainted. Was already an improvement!

After, with accent paint and paper all done!

This would have been a very easy DIY project if not for the height of the room. (Or if we'd had proper scaffolding to work on). We plan on doing something similar in our two story great room, and at least there we won't have to dangle out over the stairs!

My decorative New Year's resolution was to finally do something with our long neglected master bedroom. Other than painting it last summer, not a thought has been given to that space. So while the trim guys were doing the foyer, I had them install crown in the bedroom, and right after Christmas we found the perfect chandlier, which we put up this weekend. Still needs a lot (drapes, a few pieces of furniture, etc.) but it already feels much better:

Master Bedroom in progress. If anyone has some ideas for this room, I am all ears! Still haven't quite gotten my vision for what it should look like once it's finished.

I am linking to the wonderful Metamorphosis Monday party at Between Naps on the Porch!

Join us on Facebook!


Monday, January 2, 2012

What To Do With High Walls?

I hope everyone had a fun and love filled holiday season this year, and that 2012 will be a fabulous year for all of us. The lack of posts the past month are testament to just how busy the season was for me. Between parties, decorating, travel, and shopping, the blog unfortunately had to take a back seat for a bit. But a new year is upon us, and I will do my best to return to our regularly scheduled blogging.

And first, a transformation is in the works at my house. Visitors enter into a two-story foyer with a bridge that overlooks the front door to one side and the great room to the other. While the volume gives the house a nice open feeling, the high walls have always been a challenge. What to do with them?

 See what I mean? Acres of blank wall space! 
 The other side of the bridge.

Pieces of art were the first answer I came up with, but anything large enough was prohibitively expensive, and I hated to invest in something that would be too high up to be truly appreciated. I've seen high walls like these treated with hanging quilts or tapestries, and that's certainly a good solution in some homes, but neither seemed to suit our taste. 

After touring a builder's model last fall, the answer was clear--molding and paint! The model we saw had a similar foyer, and they had created squares of molding and painted the inside of them a contrasting color. 
So I took some measurements, laid out some ideas, and for my partner's Christmas present, had installed these striking panels:

 The "L" shaped corners will be painted in the same darker accent color that we used on the great room fireplace and a niche in the foyer. The center squares will be wallpapered--we haven't found what we want yet, but it will likely be a tone on tone damask or geometric.

I was surprised just how big a difference these panels make, even before they are painted and papered. The whole scale of the space changed, it feels much more welcoming now. Even with professionals doing the work, the paneling was cheaper than buying art to fill these walls, and had I the patience and skill to install them myself, they would have been a real bargain!

This post is linking to the Metamorphosis Monday party at "Between Naps on the Porch" Visit them for many more inspiring before and afters!

And don't forget to join us on Facebook!


Sunday, November 20, 2011

It's Time to Deck the Halls!

I have to apologize for my lack of posts and reading the past few weeks. It seems that time of year is upon is when every waking moment is taken up with something. Last weekend, the few "free" hours we had were spent decorating the inside of the  house for Christmas. Far earlier than I normally like to, but it was a "now or never" type of a thing, as plans this weekend and travel over Thanksgiving left no other time to do it.

Last year, we put up two trees--one in our formal living/music room, and a 12 footer in the great room. I LOVE decorating for the holidays, but HATE the take-down afterward. I vowed NOT to do two trees again. I should have been more specific, because we ended up with THREE.

 The tree in the formal living room/music room is covered with nearly 1,000 lights, ornaments in black, silver, blue, and mirror. The topper is done out of white poinsettia and silver ting ting, and the ribbon has a sheet music pattern. Lighting a tree is the most important part, and I wind the strings from the trunk to the tip, working my way from the bottom to the top.

 On top of the piano, and again on the sofa table in our great room, we took the limbs from an old artificial Christmas tree to make sprays. Sprinkled with lights, ribbon, and smaller ornaments, the sprays turned out beautifully considering they were made from "leftovers".

The small pencil tree in the dining room is done up with damask ribbon that picks up on the fabric of the host chairs, black and silver ornaments. An ornate mask and a few plumes of feathers top this one out. 

We got the dining room table ready for the season by swapping out the usual salad plates with something a bit more festive, created a great centerpiece with mercury glass trees and a silver snow globe, and hung a few ornaments from the chandelier. A few red accents give the table a little life.


And finally, the great room 12-footer. This tree is predominantly done in reds and bright greens, but also has a good many brown and orange ornaments. The hearth becomes home to our Christmas village, and more branches of the old Christmas tree found their way to the mantel.

Click HERE for a panoramic shot of the great room (kindly excuse the mess!)

I'm linking to the Metamorphosis Monday party at one of my favorite blogs, Between Naps on the Porch! Each week, they serve up lots of before and afters that are sure to inspire!

This post is also linking to the Holiday House Tours Party at Hooked on Houses

Be sure to join us on Facebook!

Sunday, September 11, 2011

Formal Living Room Unveiled

The formal living room at our house has been a long time in the making. I've previously written about my finds for this space--a mirrored chest scored for $200 at Homegoods, a pair of mirrored tables snatched off of clearance at Pier One. But not until a few weeks ago did I finally feel like the room was finished. (A relative term, of course, since I would love to have hardwood floors in there, a different piano, and maybe even taller crown molding, but it is finished enough for now.)

Here's what the space looked like shortly after I moved in. We'd already painted the walls Sherwin Williams Pearl Gray. The sofa had recently been recovered--breathing new life into a piece I bought for my first college apartment. I originally thought my scheme would be brown, white, and blingy. But I kept finding better things in black, so the brown rug moved to the study, the brown pillows moved to the great room, and the antique side chair, covered in brown and blue tapestry, made its way to one of the guest rooms, and the walnut end tables got a makeover in black and silver.

And here is the after. The painting is one of my favorite pieces. Since the piano is in this room, I wanted an abstract with a subtly musical motif. I scored this one at a furniture consignment store in town. The coffee table is the old end tables--a weekend project that turned out beautifully. The pillows are custom made, and the lamps are another Homegoods find. (I just love black lampshades!)


The window treatments are off the rack from JC Penny. I took their roman shades and added the ribbon detail with a little stitch witch. I'll eventually add some sort of embellishment to the drapes--a Greek Key tape on the leading edge or some fringe. The scroll arm chair was a find on a trip to High Point, and the architectural prints over the mirrored chest once hung in my high school bedroom.

The view coming down the front stairs. The upright piano isn't as out of place as this picture would indicate, but when it was last tuned, the technician told us that it couldn't be tuned again--so it will be replaced in the not-to-distant future. The mirror-framed mirror is flanked by two mirrored sconces (another Homegoods steal) that are still waiting for the perfect objects to grace them.

As always, I am linking to the Metamorphosis Monday part at Between Naps on the Porch. Every week, BNOTP brings together some of the best before-and-afters on the web. Click over there to check out more!

And don't forget to join us on Facebook!


Sunday, August 7, 2011

Time to Decorate the Master Bedroom

The one room in this house that has gotten very little attention has been the master bedroom. We only sleep in it, and no one ever sees it, so it has been low on the list of decorating priorities. Other than a coat of paint, it has been completely neglected.

It's an overwhelming space--it's about a 20 foot square with 10 foot tray ceilings, and four individual windows. We currently have a king sized bed, two nightstands, an armoire, and a dresser in the space, but it's not nearly enough furniture to fill the space. My thought is to add bookshelves, a chaise, and a media piece, but I am not sure what finish to get the additional cased goods in. The current furniture is a blonde color that isn't available anymore. While this furniture wouldn't be my first choice now, it's the right scale for the room, good quality, and I just can't justify replacing it. At the same time, I'm certainly not going to buy any more pieces in that finish. But I'm scratching my head as to what finish the bookcases and media console should be so that the room flows together.

Have a look:


The head and footboard have a fabric inset, and I think if I reupholster that it will give the furniture a whole new look. The walls are painted Sherwin Williams "Svelte Sage" the lowest portion of the ceiling is Sherwin Williams "Ancient Marble" and the highest portion of the ceiling is Sherwin Williams "Connected Gray."

Here's a panoramic view of the other side of the space:


That blank wall will, according to my current plan, be home to some nice bookcases. We'll get a  bigger TV and place some sort of piece under it there on the left. My dilemma, if the new pieces don't match the old, is that the sensible arrangement will result in the furniture on one side being one finish and the other side being another--rather than two finished mixed through the room as I would prefer.


So, here's the furniture plan I've come up with so far. (Still leaves one of the corners looking awfully blank, but I think draperies will take care of that.) Like I said, the bookcases and media console will be a different finish than the rest most likely, so it bothers me that they are lumped together and everything in the blonde wood is on the other side of the room.

With the green-gray walls being as much color as I generally want in my own bedroom, I am leaning toward doing all of the drapery, bedding, etc. in creme and brown only. I fell in love with the following fabrics:


The center fabric would be the draperies. The toile on the right would be the duvet cover. The fabric on the left would be for accents and possibly the insets on the head and footboard. Shams and throw pillows for the whole space made of all three fabrics. We'll also be putting in a chandelier, but I have yet to find the perfect one for this room. I need a wide but not terribly tall one, preferably in a nickle finish.

Would love to hear some suggestions--am I wrong to go so monochromatic with the fabrics? What finish for the new pieces might compliment the current furniture? The rest of the house fell together (at least in my mind) very easily, and I'm struggling a bit with this room. Help!


Join us on Facebook!

I am linking to the Met Monday party at Between Naps on the Porch!

Sunday, June 19, 2011

Outdoor Living

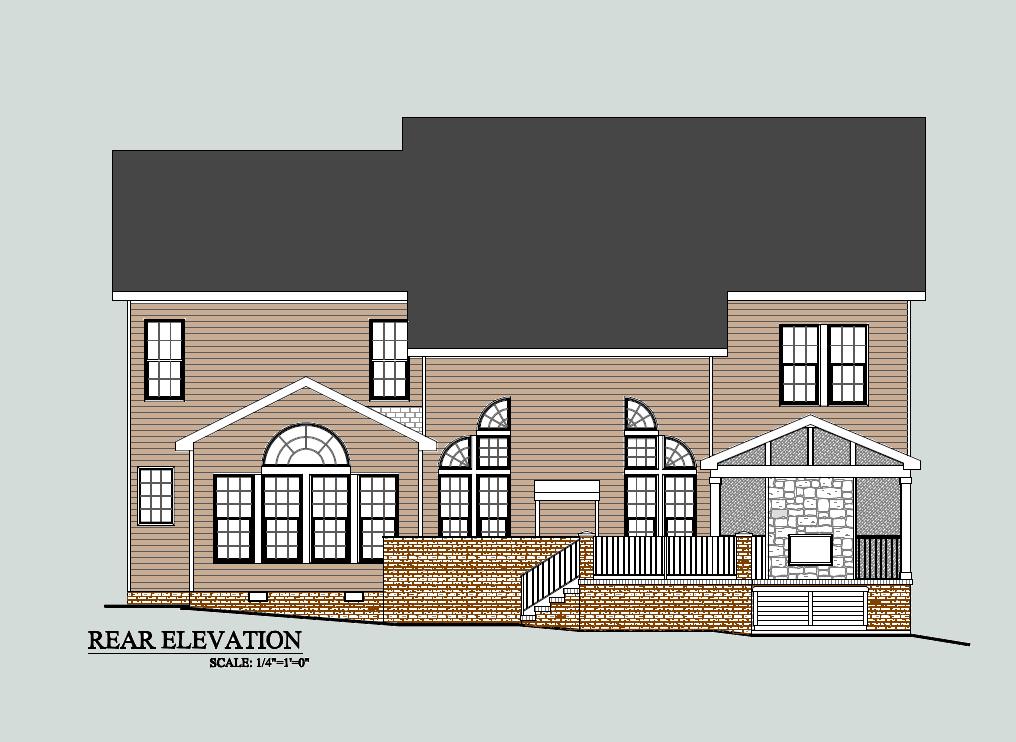
I recently finished designing a wonderful outdoor living space. It's one that I hope to enjoy someday because it's an addition to my own house! Our house has a wonderful farmhouse style front porch that stretches across the entire main block of the house. It's a great spot for having that morning cup of coffee. But the backyard is somewhat lacking in outdoor living space. We have a large patio at grade, but no covered outdoor space.
The rear of the house before.

The final design has evolved from a simple deck addition to an all-out outdoor room. The wish list included a screened porch, an elevated surface from which to access the hottub, and an outdoor kitchen. The landscaping plan gives us a great view from our morning room (the room on the left of the above picture) and also eliminates a big chunk of the grass. (Which anyone who knows me will tell you that I HATE mowing!)


So here's the plan. A large screened porch will be added off of the study and accessed from a new french door in the corner of our great room. The screened porch will be vaulted with a painted (haint blue, of course) beadboard ceiling. It will have a stone-faced double fireplace that will also be enjoyed by the hot tub. Tying the screened porch to the morning room will be a large patio (above grade, just a few inches below the house floor) with an L-shaped outdoor kitchen that has room for a mini-fridge, sink, and grille.

The existing view from the morning room.


Outside the morning room, there is a natural knoll to one side of the property. We plan to capitalize on that by doing a two-level pond with a waterfall feature between them. Behind the pond will be a planting area with myrtle trees, azaleas, and other colorful perrenials. The existing bed, seen here, will be enlarged and remain a spot for birds, roses, bulbs, and annuals.

Filling in between the pond and the annual bed will be a crab orchard stone patio on grade with a built-in firepit that hugs one side of the pond. (Perfect for smores!)

Here's a look at how the outside will look. The entire foundation will be brick to match what we already have. At the outdoor kitchen area, the brick will continue up to counter height and be capped off with the countertop material (which I would love to be honed granite!). On the other side of the patio, simple wrought iron railing will be supported by brick piers at the corners. Because I want ZERO maintenance, the screened porch structure will all be clad in vinyl and wood composite materials.

I would have liked to have a higher ceiling in the porch, but without moving the windows in the guest room above, that just wasn't possible.

The addition has been approved by the neighborhood's architectural committee, and we have a builder friend pricing it out right now. I am prepared for sticker shock, but we are open to doing the project in phases--perhaps the floor gets done first, the porch roof at another time, and the kitchen and landscaping added at another time. Unless, of course, I win the lottery.


I am linking to the Metamorphosis Monday party at "Between Naps on the Porch" Not only does Susan host a wonderful link party each week, but she also has a list of "Porch Must-Haves" that I found invaluable as we were designing our new outdoor space.


Join us on Facebook!


Sunday, May 29, 2011

Small Changes Make a Big Impact

As I've said before, sometimes small changes to a room can have a much larger impact than the effort and money put into them. Such was the case with my kitchen. Our house was built by one of the large national builders. As anyone who has ever built a home with one of that sort of builder knows, the "options" really rack up, and the price they charge for some items is just ridiculous, particularly kitchen upgrades. ($700 just to add crown to the cabinets? Puh-leeze!) So while our kitchen was large and bright, the cabinets lacked any detail and just looked like cheap boxes hung on the wall. (A shame, because they were actually nice, real wood cabinets.)


When the house was brand new. The cabinets looked short and cheap.

Painting the kitchen a warm orangey/terra cotta color helped warm it up, but the cabinets just weren't "popping."


]
After paint. (The color is not quite so saturated as the picture indicates.)

So I decided to do something about it. I tracked down the maker of the cabinetry, and a few phone calls later, had ordered matching crown molding, a taller cabinet for over the range, and had one of their installers on the way to the house. Once he had installed the new cabinet and trim, $80 bucks worth of oil-rubbed bronze hardware and a half hour with the drill finished the space off. And the results were dramatic:

The trim really gave the cabinets a level of detail they needed. And the taller cabinet over the range made the kitchen look much higher-end.


The new cabinet and trim cost less than $500--a fraction of what the builder wanted just to add the crown!

As always, I am linking up to the Metamorphosis Monday party at "Between Naps on the Porch" click on over there to see more great Before-and-Afters!

Join us on Facebook!

Sunday, May 1, 2011

The Life of a Sofa

The very first piece of furniture I ever bought for myself was a khaki colored, traditional three-cushion roll-arm sofa that I had custom made at La-Z-Boy. I ordered it the summer between my freshman and sophomore years in college, in preparation for moving into my first apartment (a newly renovated studio that had previously been a law office.) The sofa, which I ordered with a sleeper since it would have to do double-duty, was just over $1,000, a princely sum at the time. I vaguely recall looking at a few other options, none of which would have stood the test of time nearly as well.

My general rule is that large pieces of furniture (such as sofas) should be fairly neutral. It's easy to change throw pillows to give them a different look, but keeping them neutral increases the life of the piece and the number of different looks that it will work with. So let's take a look at my poor old sofa over the past 15 years:

Here it is in one of my college apartments. (Though not the first one, where it wore cranberry throw pillows and an impossibly fuzzy throw). Here, oversized denim pillows and a bolster join the factory original throws pillows. In another college-days iteration the sofa stood on a needlepoint floral rug with floral and plaid pillows.
After college, the poor thing suffered through another round of moves and looks. It got a rest in the corner of a bedroom, decked out with green and white toile pillows at one point. Was decked out in floral from April Cornell at another apartment, before finally toning down with black and tan stripes at this apartment.

In my first house, the tan sofa was in my study. (And a great place for afternoon naps!) Here, it's got oversized Ralph Lauren throw pillows, but eventually it would leave this room with a pillows in a plaid silk.

By this point the sofa was more than a little well-worn, and the back was totally sunbleached from it's years in front of the big triple window of my lakeside apartment. I looked for a replacement, but realized I was looking at sofas that looked an awful lot like the one I already had. So I sent it off to be recovered, in a winter white knit that I hoped will give it another 15 years of versatility.

Here it is fresh from the upholsterer in the living room of the townhouse I lived in for a bit. You can see I also recovered a chair to match.  In this space, I did a monochromatic white and dark brown scheme--popped off with a perfect geometric rug.

And here it is now, in our formal living room. In this space, everything is black, white, silver, or mirrored.
So which look is your favorite? My answer will always be "the current one" but every one of these looks happily reminds me of a different period of life. If you look closely through these pictures, and have seen any of the other spaces from my own home that I've had on the blog, you'll no doubt notice many reused items. 
Do any of you have a piece of furniture or other household item that has traveled with you from place to place?

As always, I am linking to the wonderful party at Between Naps on the Porch.  
Also linking this week to the party at Addicted to Decorating!

Join us on Facebook!

Sunday, April 24, 2011

Transforming the Study

The biggest do-it-yourself project that we've embarked on at my  house is the transformation of the study. It was originally set up for one person, and had a hodge-podge of furniture that functioned fine, but the room overall did not make an impression. And it needed to, as it is on the main floor of our house and guests walk right past it if they use the powder room.

We have more guest rooms than we will ever need, and had tossed around the idea of a home office for each of us. But as both myself and my other half work from home a lot, often right up til bedtime, we decided to create one office for ourselves otherwise we knew there would be days at a time where we only saw each other passing in the hall. This new office for two had to serve a few functions. First and foremost, it had to work for our needs. We took stock of all the things we needed to store and have within easy reach, all of our computer equipment, etc. We also wanted the room to have a spot for reading, and room for a television and space for all of the game system equipment. And it had to look nice.

It was a tall order. Here's a look at what we started with:

Builder white walls and unsubstantial furniture.

And only enough room for one to work!

I got to my drawing board and came up with a few solutions. Once we had settled on one, I had a cabinetmaker price the job for us. It was much higher than I expected, and more than we thought it was worth. So we got the bright idea to do a slightly simplified version ourselves. Using unfinished store-bought kitchen cabinets (which are a bit higher than a standard desk, but perfect for me because I tend to recline and sit cross-legged while I work, so my knees smash the bottom of a regular height desk) and a bevvy of unfinished trim pieces, we spent the weekend building a custom desk for two.

The number of trips to the home improvement store it took to do this project was almost comical!

We pre-painted the walls around the new desk area Sherwin Williams "Silver Strand"--a perfect soft blue-gray. Here, the base cabinets are in place. We stained them a dark mahogany to match bookshelves we already had.

We needed some overhead shelves for storage. I found some wonderful chunky "floating" shelves at the local home improvement store, and because we loaded them  up beyond capacity, decided to install soem sleek brushed nickel brackets for extra support. To give us a surface to tack reminders and notes to, I found a great framed corkboard at TJ Maxx that softens the whole composition up with it's curvy form.

Not bad for a couple of amateurs! Since this picture was taken, I've put a matching pair of lamps on the desk--repurposed from the living room.

The other side of the room.

I'm not a fan of rugs over wall-to-wall carpet, but I had this wonderful graphic rug ("Argonne" from Home Decorators Collection) that I just had to use. The drapes are Imperial Trellis-knock offs from Z Gallerie ($25!). I'm currently having an old shield-back chair reupholstered for this room. The one in here now is an antique from my great-grandparents farmhouse, and it's upholstered to match one of the guest rooms. Can't wait for the new chair to arrive--will be "unveiling" it in the next couple of weeks. The little silver tray table is a Target find ($30!) Having a lightweight arm chair here allows us to sit and read and also to easily spin the chair around to play Wii games on the television. The framed animal prints are from my college apartment--I bought them probably 15 years ago on clearance at Pier 1. The wooden tribal mask atop the bookshelves is a gift from a dear friend and quite a conversation piece. People either love it or find it completely creepy.

This is the room we spend most of our waking hours at  home in, and overall, I'm thrilled with how it turned out, particularly given how much we saved by doing it ourselves and finishing it off with bargain finds and repurposed items.

I am linking to the Metamorphosis Monday Party at Between Naps on the Front Porch.


And to the DIY Showoff Party:


And to the party at Addicted to Decorating:


And, one more at Passionately Artistic!


Join us on Facebook!

Saturday, April 23, 2011

Decisions, Decisions

My push to finish my own formal living and dining rooms is in full swing. The rooms take the usual positions on either side of the foyer, and both are painted one of my favorite colors--Sherwin Williams Pearl Gray. I've previously blogged about some of the great finds that I've landed for these rooms--the $200 mirrored chest, the $75 end tables, the $300 table, and the $150 chandelier. And I've shared my transformation of some inherited tables.

The biggest thing I've struggled to find for these two rooms is art. The formal living room has our piano in it, so I really hoped to find an abstract piece that had some sort of musical theme. I played with doing a gallery wall of framed sheet music, or a grouping of beautifully matted labels from old player-piano rolls. I tossed around the idea of a gorgeous mirror flanked by sconces. Some of these ideas may still come to fruition on a smaller scale, but after purchasing two pieces at an auction for the dining room, and finding an absolutely perfect abstract for the living room, I am feeling much better about the art situation for these rooms.


The perfect abstract for the living room!

Similarly, I struggled with what to do on the windows. Initially, I wanted imperial trellis drapes, but the cost was really outside of what I wanted to spend. And after finding a close facsimile for my study, I scratched them off the list altogether. I thought of a black and white stripe, considered a black and white damask, and even thought of doing a textured linen in a color to match the walls. Ultimately, I've decided to do an almost-white roman shade with black ribbon trim (I did a trial run of this technique in my guest bathroom--the how to can be seen HERE) and black silk panels with either a plain almost-white ribbon detail on the edge, or I may dress it up and do a Greek key border. Very simple and elegant solution, and since I'm just adding embellishments to off-the-rack drapes, very cost-effective.

But the drapery decision means that neither of the rooms have ANY pattern. I'm not opposed to this, as some of my favorite spaces right now are very simple and devoid of pattern, but these rooms needed a little life. And, so, I had to decide on some fabrics to use as accents. We need  host chairs, and having had no luck in finding any, I've resigned myself to the fact that they'll probably just have to be custom made. Luckily, the upholsterer I use has a great source for chair frames, so "custom" doesn't mean "outrageous." I also want to get an arm chair for the living room--something along the lines of a Martha Washington chair but with straighter lines.

So these three as-yet-unbought chairs will provide some much-needed life to these rooms. And the throw pillows. Let's not forget the ever-important throw pillows. I pulled various sized pillows from all around the house (I have a bit of a pillow fetish, so chances are there is a pillow of every possible size lying on a guest bed or sitting in the corner of a sofa somewhere here.) Ultimately, I decided on two 22 inch pillows for the sofa, and a total of 4 14" x 18" "kidney" pillows--two for the sofa, and one for each of the living room chairs (including the as-yet-bought accent chair.)

Off to the fabric shop I went. I came home with samples no less than five times. Crisp geometrics, fun suzanis, traditional damasks, an ikat or two, stripes, flamestitches, houndstooths, and there was even a polka-dot that caught my eye.

In the end, I narrowed it down to these choices:


But even once I'd narrowed that pool down, there were decisions on the trim. There are, of course, 7.8 million possible fringes, cordings, braids, and tassels to choose from. (Number is approximate). I wrung my hands, looked to the guidance of my seamstress, and did my "fabric dance" (laying the possibilities out, studying them carefully, then walking away for a few minutes.) But, the decision is made. The fabric is bought, and the seamstress is happily spending her Easter weekend putting them together. These six pillows, with their carefully thought out trim, cost more than any of the other "steals" for these two rooms. That's right--the pillows cost more than the dining room table, more than the cocktail tables, and more than the substantial mirrored chest. But, that's ok. I saved on those things so I could splurge on these, and, really, when I divide the cost out among six pillows, it seems quite reasonable. It occurred to me that most folks probably have a similar philosophy--there are certain things they simply MUST splurge on.

So next week the new art will be hung, the new pillows in place, and I'll provide a sneak-peak at the living room. I'm three chairs and eight panels of drapery away from a full unveiling.

Join us on Facebook!